
 Share on facebook
 Tweet
Tweet Email
Email Share on Linkedin


Tips for a Net Zero House
If you’ve followed my work for very long, you’ll realize that I basically stopped talking about “Green Building” about 3-4 years ago. The term “Green” has been too watered down to mean anything anymore. Instead, I talk about “High Performance Houses”, or “Comfort”. I find that my clients have had un-comfortable houses in the past and that talking about comfort really resonates. I also have lots of clients who want low energy bills. The lure of a Zero dollar electric bill is pretty awesome.
In this blog post, I thought I’d give you the extended version of this house’s story from the video. This is a house my company built for Forge Craft Architecture‘s founder Scott Ginder and his family. It’s a house that will generate enough electricity with it’s Solar Array to have a Zero sum electric bill for the course of the entire year. (some months the bill will be negative, some months they will have to pay, but overall if you sum the 12 months of the year it will be $0)

#1 Design:
This is where it all starts. The Architect on this project did everything right from a design perspective. He didn’t make the house too big (it’s right at 2000 sq feet of conditioned space). Remember the advice of famous Architect Sarah Susanka author of the “Not So Big House” series. (if you are designing a house I highly recommend this series of books)
“Every room — indeed, every square foot . . . has been designed as everyday living space, … and the money saved by reducing the volume of space has been invested instead in tailoring to fit its owners to a T: on beautiful design and craftsmanship, on healthy and resource-efficient materials, and on better building practices.” -Sarah Susanka


Scott did a fantastic job of making the most of every square foot, but he also made the most of every window without going overboard. Remember that even the most expensive Double Pane window is about R-3, and if you compare that with a well insulated wall at R-20+ you’ll quickly see how glass houses can be hard to heat or cool.
#2 Air Sealing
I’ve come to be a huge believer in “Building Tight” over the last 10 years. This is one of the few things that a builder can do with very specific measured results at the end. If you build a tightly air sealed house you won’t waste energy by leaking in hot/humid (or pollen filled) air. The blower door test doesn’t lie. Shoot for a blower door score of 3ACH50 or less if you’re planning for a Net Zero house (or any new build or remodel for that matter). If you really want to build a fantastic house shoot for 1ACH50 or less! This house blew a blower door score of 1.9ACH50. Tight!


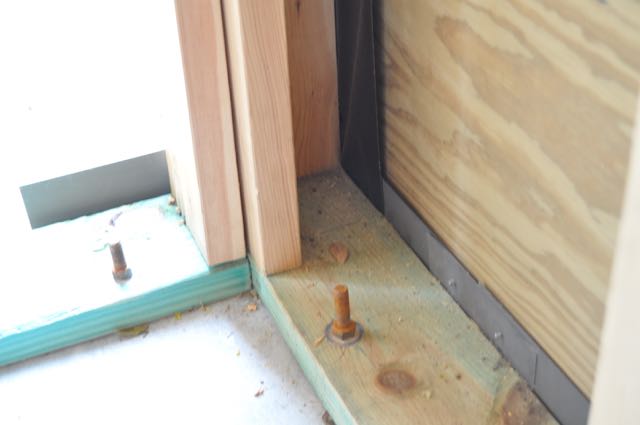
We used Tremco Dymonic caulk at the slab to bottom plate connections for additional air sealing.
#3 INsulation + OUTsulation
We used 2×6 exterior walls with Advanced Framing on this project. We insulated the headers with a layer of 3/4″ rigid foam, and we added a layer of 3/4″ foam on all the exterior walls. We added a 2″ layer of PolyIso insulation on top of the roof deck, then sprayed Open Cell foam 7″ thick at the roof, and 5.5″ thick at the garage ceiling (for the bedroom floors above), and at the walls adjacent to the garage for extra air sealing. We used Owens Corning Energy Complete blown-in fiberglass & air sealing program on the exterior walls. I shot a great video on Advanced vs Traditional Framing at this house if you’d like to see more.


We also insulated the outside of this slab with termite resistant Bora-Foam from Nissus Corp. This made an R-11 continuous exterior insulated slab.


This house is well insulated and we did a good job of making up for what little thermal bridging we had with our advanced framing.
#4 Top Notch Mechanical Systems:
I mentioned it in the video but I can’t stress this enough. You should work with a mechanical designer to match your system to your houses’s loads. Way too many houses have over-sized HVAC systems because the contractor didn’t spend the time or money to do a detailed design. I actually pay a third party design firm (Positive Energy here in Austin, TX) do do a Manual J load calculation, then a Manual D duct design, and I have the do equipment specifications so I can had a big package to my HVAC sub-contractor to give me a bid. Most HVAC subs get these load calculations done from their supply house and they really are focused on output and not quality.
You’ll also notice in the video that we used Mitsubishi’s VRF technology for our Heat Pump HVAC system. If you are considering Net Zero I would highly recommend Mitsubishi or at least another manufacturer with VRF in their lineup. This technology has been used in Europe/Asia for the last 30 years by Mitsubishi, Daikin, and LG but it’s very new to the American HVAC manufacturers. See my other videos on YouTube for greater depth about VRF and why it’s so fantastic.
Lastly, we used a Heat Pump water heater in this house for the domestic hot water. A Heat Pump water heater takes the heat from the surrounding air and funnels that into the tank to make hot water. The resulting discharge is chilled and dehumidified air! In our hot/humid Texas climate it makes perfect sense to put this unit indoors so the Architect designed a great mechanical closet in the foyer to double as a coat closet. We ducted the output of the Heat Pump water heater to the kitchen to provide a bit of extra cooling. (turns out we didn’t want that in the winter so we are going back to make a damper to direct that cold air to the foyer in the winter time) This mechanical closet with a small return was a terrific place to put the Panasonic ERV in the ceiling. This little wonder is a bargain for fresh air on a tight house (and budget). We also have a plug in dehumidifier in the mech closet for use in the shoulder seasons to knock down the humidity in the house. I put a Dehumidifier in all my houses for comfort and this is the least cost option, but still provides fantastic comfort control.


In conclusion, I love how the Solar Array on this house was done AFTER the construction. It showed me that the Architect/Client really understood that the goals for the house were more than Net Zero. It’s fantastic to have a $0 electric bill, but it’s a total failure of a build if the house isn’t comfortable or it’s not durable.


Thanks for taking the time to read this post. Let me know if you have any questions or comments. I love talking about this geeky stuff, and I wish you the best in your Net Zero #BUILD!
Best,
Matt Risinger
Risinger Homes in Austin, TX